10 Best Next.js Project Structure Tips for Beginners
At Nexotips Infotech, we believe that a well-organized Next.js project structure is the foundation of building scalable, maintainable, and high-performing applications. If you’re new to Next.js, one of the biggest challenges you’ll face is understanding how to structure your project so it remains clean and easy to extend as your app grows.
In this guide, we’ll walk you through the 10 best Next.js project structure tips for beginners that will help you write professional-grade code and follow industry best practices.
Table of Contents
1. Why Project Structure Matters in Next.js
A strong Next.js project structure ensures:
- Faster development and onboarding
- Easier debugging and troubleshooting
- Scalability for future features
- Better collaboration in teams
Imagine working on a project where files are scattered everywhere. Every developer wastes time searching for components or styles. With a clean structure, everything is exactly where you expect it to be. Poor organization often leads to bugs, duplicated code, and longer development time. A good setup saves you countless hours in the long run.
2. Use a Clean Folder Structure
Start with a simple but effective folder hierarchy. A recommended structure looks like this:
/pages
/components
/styles
/public
/utils
This structure separates concerns clearly. Your pages define routes, components handle UI, styles manage CSS, public contains static assets, and utils stores reusable logic.
If your app grows, you can extend this by adding /hooks, /context, or /services folders. Keeping this discipline early helps you scale smoothly later.
👉 For more folder structure options, check the official Next.js documentation.
3. Organize Components Properly
Your /components The folder is where you’ll spend most of your time. Keep it clean by following these steps:
- Create a sub-folder
/components/uifor reusable UI elements (buttons, inputs, modals). - Create
/components/layoutsfor headers, footers, and sidebars. - Create
/components/sectionsfor larger page-specific sections like hero banners or feature lists.
This way, you can reuse the same button or card component across multiple pages without duplicating code. Small, focused components also make testing easier.
4. Create a Pages Directory with Clear Routing
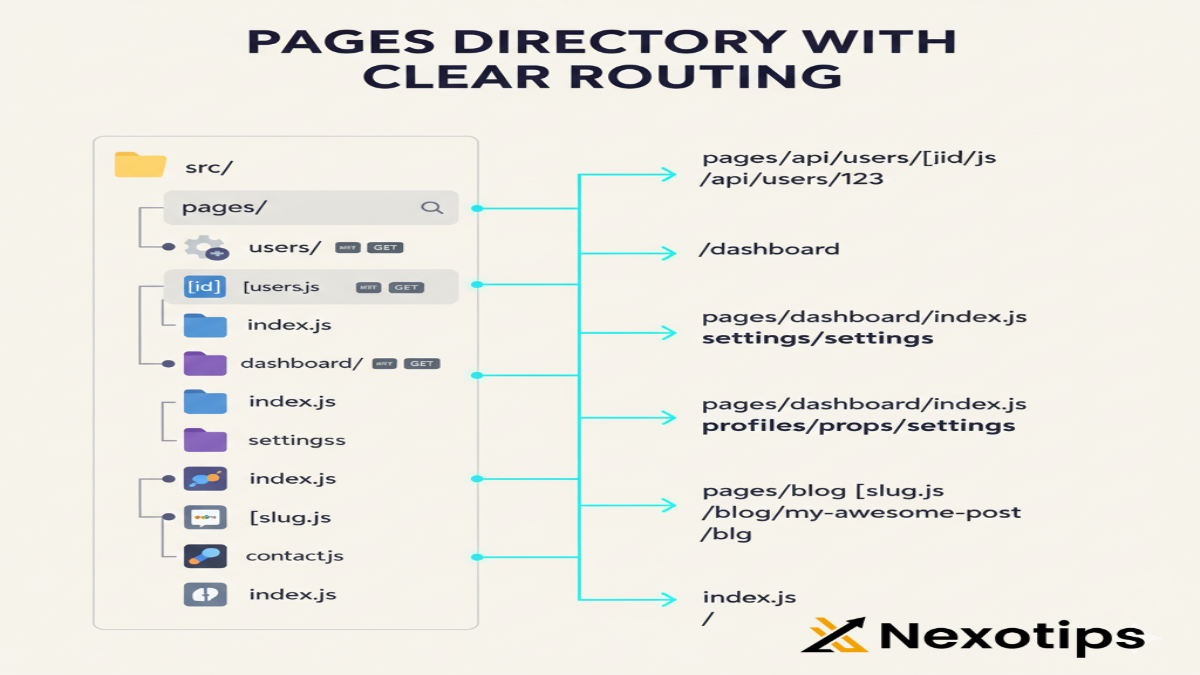
One of the best things about Next.js is its file-based routing system. The /pages directory directly maps to your app’s URLs:
/pages/index.js→ Home page/pages/about.js→ About page/pages/blog/[slug].js→ Dynamic blog routes
Always keep your file names descriptive and simple. For example, instead of mypage.js using contact.js. This improves SEO and makes your project more beginner-friendly.
5. Use Layouts for Consistent UI
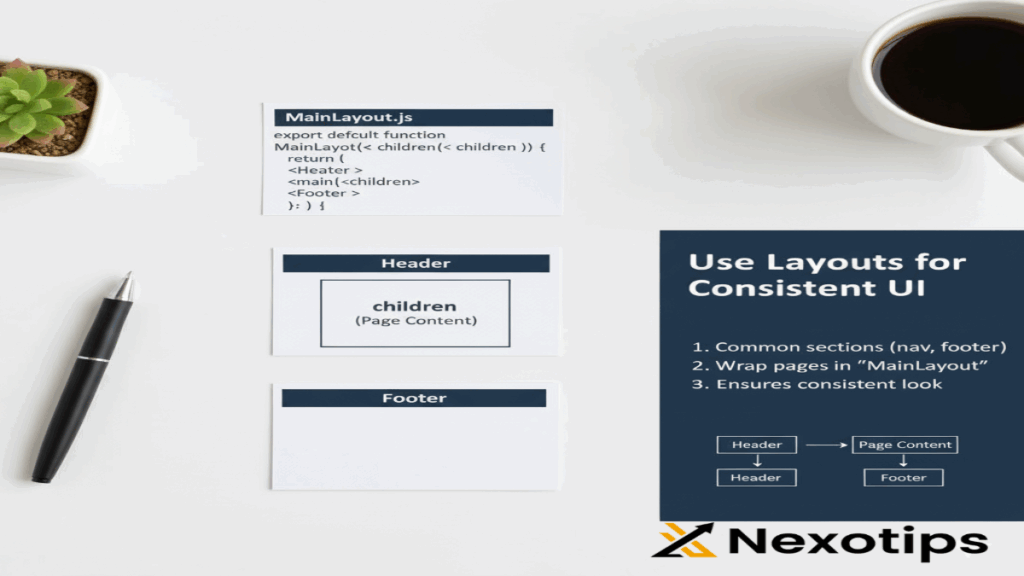
Every website has common sections—like navigation, footers, and sidebars. Instead of repeating them across pages, create a /layouts folder.
export default function MainLayout({ children }) {
  return (
    <>
      <Header />
      <main>{children}</main>
      <Footer />
    </>
  );
}
You can wrap your pages inside MainLayout, ensuring a consistent look and feel. This is especially useful when you add authentication layouts (e.g., dashboard vs. public pages).
6. Manage Assets in a Separate Folder
Static files, such as images, icons, and fonts, should live inside /public. Organize them like this:
/public/images
/public/icons
/public/fonts
When adding images, use descriptive alt text like:
<img src="/images/nextjs-structure.png" alt="Next.js Project Structure Example" />7. Add Utility and Helper Functions
Keep all helpers (e.g., date formatters, API calls) in a /utils or /lib folder. Example:
/utils/formatDate.js
/utils/apiClient.js
This makes functions reusable and easier to test.
8. Use Environment Variables Securely
Create a .env.local file for sensitive data like API keys. Example:
NEXT_PUBLIC_API_URL=https://api.example.comRemember:
- Never commit
.envfiles to GitHub. - Add them to
.gitignore. - Use
NEXT_PUBLIC_A prefix for variables that need to be exposed in the browser.
This practice keeps your app secure while making configuration flexible across environments (dev, staging, production).
9. Maintain a Styles Folder (CSS/SCSS)
Managing styles is easier when you centralize them. Keep everything inside /styles. Example:
/styles/globals.css
/styles/Home.module.css
If you’re using Tailwind CSS, maintain a clear tailwind.config.js file and document its usage. For larger apps, consider splitting global styles, theme variables, and module-specific CSS. If using Tailwind CSS, keep config files at the root and document their usage.
10. Document Your Code and Structure

Documentation is crucial. Maintain a README.md file explaining:
- Project structure
- Naming conventions
- How to run the project
This makes onboarding new developers much easier.
Final Thoughts
A clean Next.js project structure is more than just organizing folders—it’s about improving developer experience, collaboration, and long-term scalability. At Nexotips Infotech, we’ve worked with many Next.js projects and consistently found that these practices lead to faster development and fewer bugs.
By following these 10 Next.js project structure tips for beginners, you’ll not only keep your codebase clean but also set yourself up for long-term success. Whether you’re working solo or as part of a team, a well-structured project is one of the best investments you can make in your coding journey.
Want to learn more? Check out our other coding-related blogs on the Nexotips blog.