


If you’re eager to master Angular CRUD projects but don’t want to dive into APIs just yet, fear not! You can embark on a journey to proficiency in just four steps. Angular CRUD projects involve Create, Read, Update, and Delete operations, and by following this simple roadmap, you’ll soon be navigating them with confidence.
Angular is a well-liked and potent JavaScript framework that we may use to create web applications. Google has made the framework open source so that anybody may work with it.


We shall examine Angular CRUD operations without the use of APIs in this post. This post will begin as a tutorial on creating a Angular CRUD; it will be a step-by-step manual.
See what precisely we are constructing, please.


The table in the above image has a button labeled “Add User,” and when we click it, a popup window appears as seen below.

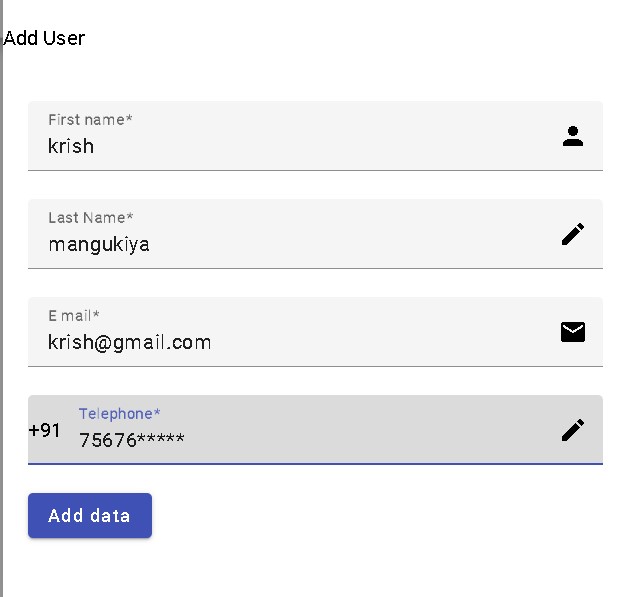
In essence, we are showing some user data in the table above, and this is the form we use to add and modify people.
For design, I’ve included Angular Material (https://material.angular.io/) and Bootstrap in this application.
Let’s examine each step by step.
Angular CRUD Project start here:
Angular CRUD Step 1: Create Angular Porject.
ng new angularCrud
cd angularCrud
Install bootstrap now using the CLI below.
npm i bootstrapInclude it in angular.JS files go into scripts and JSON files into styles.
"node_modules/bootstrap/dist/css/bootstrap.min.css"
"node_modules/bootstrap/dist/js/bootstrap.min.js"
use the CLI below to add Angular Material immediately.
ng add @angular/materialnow carry out the project
ng serveit will run on http://localhost:4200/
Angular CRUD Step 2: Design the View.
The project structure is shown below.
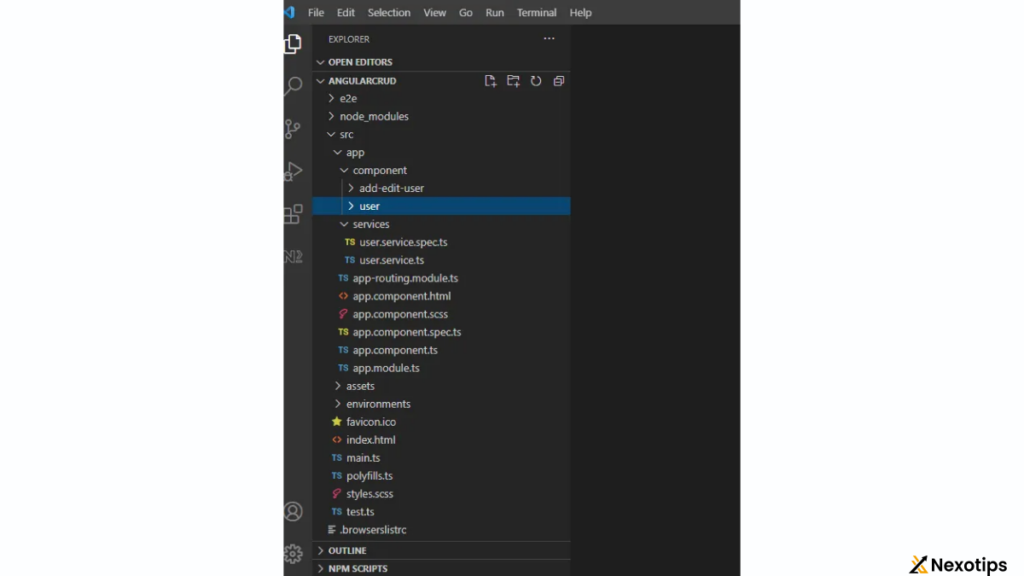
The side app folder has two folders: one labeled component and the other services. The components in the component folder are userComponent and addEditUserComponent, while the services folder has a single userService.
Let’s review our work on the components and services.
I started by creating a user component using the CLI below.
ng g c userAppComponent is the default bootstrap component; delete all HTML from app.component.html and insert the userComponent selector into the app component as seen in line 1 below.
<app-user></app-user>Now that everything within the userComponent has been shown, you can see what I’ve done there.
<div class="container">
    <div class="row">
        <div class="col-sm-6">
            <h4>User Details</h4>
        </div>
        <div class="col-sm-6" style="text-align: right;">
            <button mat-stroked-button color="primary" (click)="openPopup()" style="width: 10rem;">+Add User</button>
        </div>
    </div>
    <table mat-table [dataSource]="userDetails" class="mat-elevation-z8">
        <ng-container matColumnDef="Id">
            <th mat-header-cell *matHeaderCellDef> ID. </th>
            <td mat-cell *matCellDef="let element; let i = index"> {{i}} </td>
        </ng-container>
        <ng-container matColumnDef="First Name">
            <th mat-header-cell *matHeaderCellDef> First Name </th>
            <td mat-cell *matCellDef="let element"> {{element.firstName}} </td>
        </ng-container>
        <ng-container matColumnDef="Last Name">
            <th mat-header-cell *matHeaderCellDef> Last Name </th>
            <td mat-cell *matCellDef="let element"> {{element.lastName}} </td>
        </ng-container>
        <ng-container matColumnDef="Email">
            <th mat-header-cell *matHeaderCellDef> Email </th>
            <td mat-cell *matCellDef="let element"> {{element.email}} </td>
        </ng-container>
        <ng-container matColumnDef="Contact">
            <th mat-header-cell *matHeaderCellDef> Contact </th>
            <td mat-cell *matCellDef="let element"> {{element.contact}} </td>
        </ng-container>
        <ng-container matColumnDef="Action">
            <th mat-header-cell *matHeaderCellDef> Action </th>
            <td mat-cell *matCellDef="let element; let j = index">
                <button class="edit-btn" (click)="editUser(j, element)"><span class="material-icons" style="color: blue;">create</span></button>
                <button class="delete-btn" (click)="deleteUser(j)"><span class="material-icons" style="color: red;">delete_outline</span></button>
            </td>
        </ng-container>
        <tr mat-header-row *matHeaderRowDef="displayedColumns"></tr>
        <tr mat-row *matRowDef="let row; columns: displayedColumns;"></tr>
    </table>
</div>
I’ve included an angular material table to the file above.
import { Component, OnInit } from '@angular/core';
import { MatDialog, MatDialogRef, MAT_DIALOG_DATA } from '@angular/material/dialog';
import { MatTableDataSource } from '@angular/material/table';
import { AddEditUserComponent } from '../add-edit-user/add-edit-user.component';
import { UserService } from '../../services/user.service';

@Component({
  selector: 'app-user',
  templateUrl: './user.component.html',
  styleUrls: ['./user.component.scss']
})
export class UserComponent implements OnInit {
  displayedColumns: string[] = ['Id','First Name', 'Last Name', 'Email', 'Contact', 'Action'];
  userDetails: MatTableDataSource<Element>

  constructor(
    public dialog: MatDialog,
    public userService: UserService,
  ) { }

  ngOnInit(): void {
  }

  private getUsers() {
    this.userDetails = new MatTableDataSource<Element>(this.userService.getUser());
  }

  public openPopup() {
    const dialogRef = this.dialog.open(AddEditUserComponent, {
      width: '350px',
      data: {}
    });

    dialogRef.afterClosed().subscribe(() => {
      this.getUsers();
    });
  }

  public editUser(index, data) {
    data.id = index;
    data.action = 'edit';
    const dialogRef = this.dialog.open(AddEditUserComponent, {
      width: '350px',
      data: data
    });

    dialogRef.afterClosed().subscribe(() => {
      this.getUsers();
    });
  }

  public deleteUser(index) {
    const data = {
      action: 'delete'
    }
    const dialogRef = this.dialog.open(AddEditUserComponent, {
      width: '400px',
      data: data
    });

    dialogRef.afterClosed().subscribe((result) => {
      if (result) {
        this.userService.deleteUser(index);
        this.getUsers();
      }
    });
  }
}
To open the user form popup, I have included openDialog() to this code. If you are unfamiliar with Angular material popups, see this link: https://material.angular.io/components/dialog/overview.
There is one more component, addEditUserComponent, which displays the form that we use to create and change user information.
<div class="container" *ngIf="incomingData && incomingData.action !== 'delete'">
    <div class="row form-title">
        <h3>Add User</h3>
    </div>
    <div class="row">
        <form class="example-form" [formGroup]="addUserForm" (ngSubmit)="addUser()">
            <mat-form-field class="example-full-width">
                <mat-label>First Name</mat-label>
                <input matInput formControlName="firstName">
            </mat-form-field>
            <mat-form-field class="example-full-width">
                <mat-label>Last Name</mat-label>
                <input matInput formControlName="lastName">
            </mat-form-field>
            <mat-form-field class="example-full-width">
                <mat-label>Email</mat-label>
                <input matInput formControlName="email">
            </mat-form-field>
            <mat-form-field class="example-full-width">
                <mat-label>Contact</mat-label>
                <input matInput formControlName="contact">
            </mat-form-field>
            <div class="row action-btn-div">
                <button mat-raised-button color="warn" class="cancel-btn" (click)="closePopup()">CANCEL</button>
                <button type="submit" mat-raised-button color="primary" class="save-btn" [disabled]="addUserForm.invalid">SAVE</button>
            </div>
        </form>
    </div>
</div>

<div class="container" *ngIf="incomingData && incomingData.action === 'delete'">
    <div class="row">
        <h2 style="font-weight: 500;">Are you sure you want delete this?</h2>
    </div>
    <div class="row">
        <button mat-raised-button color="warn" class="yes-btn" (click)="deleteUser()">YES</button>
        <button mat-raised-button class="no-btn" (click)="cancelDelete()">NO</button>
    </div>
</div>
ReactiveForms is being used here, as the file above illustrates.
import { Component, Inject, OnInit } from '@angular/core';
import { FormBuilder,FormControl, FormGroup, Validators } from '@angular/forms';
import { MatDialog, MatDialogRef, MAT_DIALOG_DATA } from '@angular/material/dialog';
import { UserService } from '../../services/user.service';

@Component({
  selector: 'app-add-edit-user',
  templateUrl: './add-edit-user.component.html',
  styleUrls: ['./add-edit-user.component.scss']
})
export class AddEditUserComponent implements OnInit {
  addUserForm: FormGroup;
  constructor(
    public dialogRef: MatDialogRef<AddEditUserComponent>,
    public userService: UserService,
    private formBuilder: FormBuilder,
    @Inject(MAT_DIALOG_DATA) public incomingData: any
  ) { }

  ngOnInit(): void {
    this.addUserForm = new FormGroup({
        id: new FormControl(''),
        firstName: new FormControl('', Validators.required),
        lastName: new FormControl('', Validators.required),
        email: new FormControl('', Validators.required),
        contact: new FormControl('', Validators.required)
    })
    this.addUserForm.patchValue(this.incomingData);
  }

  public closePopup() {
    this.dialogRef.close();
    this.addUserForm.reset();
  }

  public addUser() {
    if (this.incomingData && this.incomingData.action && this.incomingData.action === 'edit') {
      this.userService.editUser(this.incomingData.id, this.addUserForm.value);
      this.dialogRef.close();
    } else {
      this.userService.addUser(this.addUserForm.value);
      this.dialogRef.close();
    }
  }

  public deleteUser() {
    this.dialogRef.close(true);
  }

  public cancelDelete() {
    this.dialogRef.close(false);
  }
}
This file contains the addUser() function, which we use to add and edit users depending on conditions. We feed the conditions to the function from the userComponent; if the conditions are changed, the function adds a new user and updates the specific user data index; if the conditions are left unchanged, the function updates the user data index.
We still have the file user.service.ts, which I created using the Angular CLI. Let’s check what I’ve done with it.
ng g s userServiceimport { Injectable } from '@angular/core';
import { Observable } from 'rxjs';
interface UserType {
firstName: string,
lastName: string,
email: string,
contact: string,
}
@Injectable({
providedIn: 'root'
})
export class UserService {
userDetails: any[] = [];
constructor() { }
public getUser() {
return this.userDetails;
}
public addUser(data: UserType) {
this.userDetails.push(data);
}
public editUser(index: number, data: UserType) {
this.userDetails[index] = data;
}
public deleteUser(index: number) {
this.userDetails.splice(index, 1)
}
}We have defined the userDetails variable and the userService declared interface, as indicated in the file above from lines 4–8. Let’s now examine the functions one by one.
getUser(): This function returns the userDetails; thus, in order to use this function in the component, we must first create an instance of the service in the constructor before importing the service. You can see how we need to obtain data from the service by looking at the two component files we have previously attached.
addUser(): as seen in the add-edit-user-component.ts code above, this function is used inside addEditUserComponent to add or push data to the userDetails variable.
editUser(): In this method, we update the data in the userDetails variable. To do this, we retrieve the index and data from addEditUserComponent, and we replace the existing data at the specified index with the new data that we pass from the form.
deleteUser() — as shown in userComponent at line number 63, this method deletes user data at a certain index by supplying the index from the userComponent deleteUser function.
We have now completed the CRUD process.
We plan to enhance the interactiveness of the delete feature by incorporating a confirmation dialog box that prompts users to indicate if they wish to delete specific user information.
Angular CRUD Step 3: The remove user confirmation dialog.
I’ve already demonstrated the code in the files above; let’s examine its functionality.
Then, we are opening AddEditUserComponent and passing the data of the data variable; this will open AddEditUserComponent and it will check for condition; we have written content for confirmation dialog in add-edit-user.component.html file from line(31–38), we are displaying it is based on delete action condition by using *ng. This is done in user.component.ts inside the deleteUser() function from lines 52–67.If there are two buttons, YES and NO, only the YES button will erase specific user information.