
Angular Data Passing Between Components: A Step-by-Step Guide with 4 Easy Examples
“Data passing” is a key feature of Angular, a robust framework for web application development. Whether you’re a novice or an experienced developer, mastering the art of efficiently Data Passing between components can significantly enhance your Angular applications. In this comprehensive guide, supported by three detailed examples, we will delve into the best practices for data passing between Angular components.
Why Data Passing in Angular is Important
Building dynamic and interactive apps requires the Data Passing between components. It enables interaction between components as well as information sharing and change response. Three primary techniques for data passing in Angular will be covered in this guide:
- Employing the decorators @Input() and @Output()
- Making use of a shared service
- Applying a library for state management
Using Angular, data passing is essential to building dynamic, coherent online apps. It makes it easier for components to communicate with one another, sharing information and enabling quick adjustments. This is the reason it’s crucial:
- Component Interaction: A component-based architecture is used in the development of Angular apps. Ideally, each part should carry out a certain task. In order to produce a seamless user experience, these elements frequently require Data Passing. For instance, a parent component may need to Data Passing entered by the user to a child component so that it may be processed.
- Maintainability: Your code becomes more structured and manageable when data flows between components are specified explicitly. Because each component has a well defined interface, managing and debugging it is easier.
- Reusability: Component reusability is enhanced by efficient Data Passing. It is simple to reuse components that are made to take input and produce output in other areas of your program or even in other projects.
- State Management: It might be difficult to keep track of the state across different components in complicated applications. Maintaining a consistent and predictable application state is made easier with the use of appropriate Data Passing methods, such services or state management libraries.
- Dynamic User Interfaces: Real-time Data Passing are frequently the foundation of interactive and dynamic UIs. For example, a modification to a form component need to be instantly reflected in a summary component. Ensuring data transmission keeps the application’s components all in sync.
- Scalability: The capacity to Data Passing between components quickly and effectively becomes more crucial as your program expands. Scalable data passing methods keep your application manageable and performant. Examples of this include leveraging state management libraries like NgRx or services.
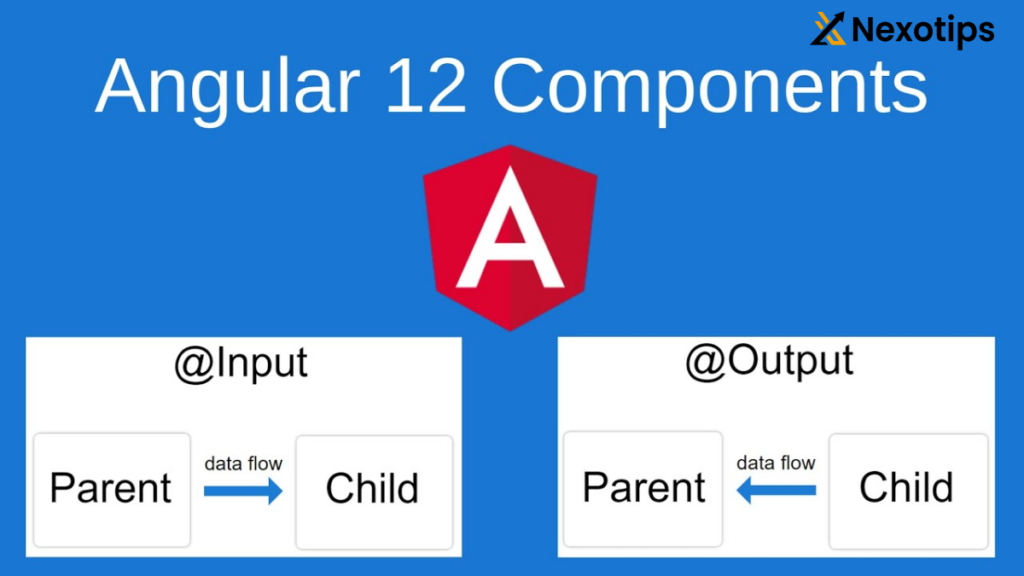
Method 1: Using @Input() and @Output() Decorators
The @Input() and @Output() decorators are fundamental tools for passing data between parent and child components in Angular.
1.Passing Data from Parent to Child Component
Step-by-Step Guide:
- Create the Parent Component:
// parent.component.ts
import { Component } from '@angular/core';

@Component({
  selector: 'app-parent',
  template: `<app-child [childMessage]="parentMessage"></app-child>`,
})
export class ParentComponent {
  parentMessage = 'Hello from Parent Component!';
}
- Create the Child Component:
// child.component.ts
import { Component, Input } from '@angular/core';

@Component({
  selector: 'app-child',
  template: `<p>{{ childMessage }}</p>`,
})
export class ChildComponent {
  @Input() childMessage: string;
}
- Result:
When you run your Angular application, the child component will display the message passed from the parent component.
2: Passing Data from Child to Parent Component
Step-by-Step Guide:
- Create the Parent Component:
// parent.component.ts
import { Component } from '@angular/core';

@Component({
  selector: 'app-parent',
  template: `
    <app-child (messageEvent)="receiveMessage($event)"></app-child>
    <p>{{ message }}</p>
  `,
})
export class ParentComponent {
  message: string;

  receiveMessage($event) {
    this.message = $event;
  }
}
- Create the Child Component:
// child.component.ts
import { Component, Output, EventEmitter } from '@angular/core';

@Component({
  selector: 'app-child',
  template: `<button (click)="sendMessage()">Send Message</button>`,
})
export class ChildComponent {
  @Output() messageEvent = new EventEmitter<string>();

  sendMessage() {
    this.messageEvent.emit('Hello from Child Component!');
  }
}
- Result:
Clicking the button in the child component sends a message to the parent component, which then displays it.
Advantages of Using a @Input() and @Output() Decorators
- Decoupled Components: These parts are no longer dependent on direct parent-child ties and are capable of autonomous communication. This improves the application architecture’s flexibility and reusability.
- Reactivity: To guarantee that data changes are immediately communicated across components, signals make use of observables like BehaviorSubject. Your application will be more responsive and have real-time changes thanks to this reactive technique.
- Centralized State Management: The rationale for state management is centralized when signals are managed by a service. This makes maintenance and debugging easier because there’s just one source of truth for data updates.
- Scalability: Using a service with signals guarantees that your data transmission technique stays effective and controllable as your application gets larger and more complicated. It allows for scalability without sacrificing speed or making component interactions more complicated.
Method 2: Using a Shared Service
Using a shared service is an efficient way to share data between components that aren’t in a parent-child relationship.
3: Sharing Data with a Service
Step-by-Step Guide:
- Create the Data Service:
// data.service.ts
import { Injectable } from '@angular/core';
import { BehaviorSubject } from 'rxjs';

@Injectable({
  providedIn: 'root',
})
export class DataService {
  private messageSource = new BehaviorSubject<string>('Default Message');
  currentMessage = this.messageSource.asObservable();

  changeMessage(message: string) {
    this.messageSource.next(message);
  }
}
- Update the First Component to Send Data:
// component-a.component.ts
import { Component } from '@angular/core';
import { DataService } from '../data.service';

@Component({
  selector: 'app-component-a',
  template: `<button (click)="sendMessage()">Send Message</button>`,
})
export class ComponentAComponent {
  constructor(private dataService: DataService) {}

  sendMessage() {
    this.dataService.changeMessage('Hello from Component A!');
  }
}
- Update the Second Component to Receive Data:
// component-b.component.ts
import { Component, OnInit } from '@angular/core';
import { DataService } from '../data.service';

@Component({
  selector: 'app-component-b',
  template: `<p>{{ message }}</p>`,
})
export class ComponentBComponent implements OnInit {
  message: string;

  constructor(private dataService: DataService) {}

  ngOnInit() {
    this.dataService.currentMessage.subscribe(message => this.message = message);
  }
}
- Result:
Clicking the button in Component A changes the message, which is then displayed in Component B.
Advantages of Using a Shared Service
- Centralized Data Management: Shared services provide a centralized location to manage and store data, ensuring consistency and reducing duplication across components.
- Facilitates Inter-component Communication: Components that are not directly related (i.e., not parent-child) can communicate seamlessly through a shared service, promoting a loosely coupled architecture.
- Encourages Reusability: Services encapsulate data logic and operations, making it easier to reuse across different components and even different parts of the application.
- Supports Dependency Injection: Angular’s dependency injection mechanism allows services to be injected into components, ensuring that instances are shared and managed efficiently throughout the application lifecycle.
Method 3: Using a Service with a Signal in Angular
Using services with signals may significantly improve data management and data passing between components in current Angular apps. Signals offer an agile approach to managing modifications, guaranteeing that your application stays responsive and effective. This tutorial will teach you how to set up an Angular service with a signal for data transmission.
Example 1: Using a Service with a Signal
Step-by-Step Guide:
- Create the Signal Service:
First, we’ll create a service that holds a signal to manage our data.
// signal.service.ts
import { Injectable } from '@angular/core';
import { BehaviorSubject } from 'rxjs';

@Injectable({
  providedIn: 'root',
})
export class SignalService {
  private messageSource = new BehaviorSubject<string>('Default Signal Message');
  currentMessage = this.messageSource.asObservable();

  changeMessage(message: string) {
    this.messageSource.next(message);
  }
}
In this service, we use a BehaviorSubject to hold the current message. This allows us to emit new messages and listen for changes.
- Update the First Component to Send Data:
Next, we’ll update a component to send data through the signal service.
// component-a.component.ts
import { Component } from '@angular/core';
import { SignalService } from '../signal.service';

@Component({
  selector: 'app-component-a',
  template: `<button (click)="sendMessage()">Send Signal</button>`,
})
export class ComponentAComponent {
  constructor(private signalService: SignalService) {}

  sendMessage() {
    this.signalService.changeMessage('Hello from Component A with Signal!');
  }
}
In this component, we inject the SignalService and call the sendMessage method to update the message in the service.
- Update the Second Component to Receive Data:
Finally, we’ll update another component to receive and react to data changes.
// component-b.component.ts
import { Component, OnInit } from '@angular/core';
import { SignalService } from '../signal.service';

@Component({
  selector: 'app-component-b',
  template: `<p>{{ message }}</p>`,
})
export class ComponentBComponent implements OnInit {
  message: string;

  constructor(private signalService: SignalService) {}

  ngOnInit() {
    this.signalService.currentMessage.subscribe(message => this.message = message);
  }
}
In this component, we subscribe to the currentMessage observable from the service to receive updates and display them.
- Result:
When you run the application and click the button in Component A, the message in Component B will update to reflect the new signal.
Advantages of Using a Signaled Service
- Decoupled Components: It is not necessary for parent-child connections to exist for components to interact.
- Reactivity: Updates are effectively disseminated by using signals, which offer a reactive method of handling data changes.
- Scalability: This method makes state management across various components easy and scales well as your application expands.

Method 4: Using a State Management Library
State management libraries like NgRx provide a robust solution for managing application state across multiple components.
Managing State with NgRx
Step-by-Step Guide:
- Install NgRx:
ng add @ngrx/store
ng add @ngrx/effects
- Set Up the Store:
// app.module.ts
import { BrowserModule } from '@angular/platform-browser';
import { NgModule } from '@angular/core';
import { StoreModule } from '@ngrx/store';
import { appReducer } from './store/reducers/app.reducer';

import { AppComponent } from './app.component';

@NgModule({
  declarations: [AppComponent],
  imports: [BrowserModule, StoreModule.forRoot({ app: appReducer })],
  providers: [],
  bootstrap: [AppComponent],
})
export class AppModule {}
- Create Actions:
// store/actions/app.actions.ts
import { createAction } from '@ngrx/store';

export const changeMessage = createAction('[App] Change Message', (message: string) => ({ message }));
- Create Reducers:
// store/reducers/app.reducer.ts
import { createReducer, on } from '@ngrx/store';
import { changeMessage } from '../actions/app.actions';

export interface AppState {
  message: string;
}

export const initialState: AppState = {
  message: 'Default Message',
};

const _appReducer = createReducer(
  initialState,
  on(changeMessage, (state, { message }) => ({ ...state, message }))
);

export function appReducer(state, action) {
  return _appReducer(state, action);
}
- Dispatch Actions in a Component:
// component-a.component.ts
import { Component } from '@angular/core';
import { Store } from '@ngrx/store';
import { AppState } from '../store/reducers/app.reducer';
import { changeMessage } from '../store/actions/app.actions';

@Component({
  selector: 'app-component-a',
  template: `<button (click)="sendMessage()">Send Message</button>`,
})
export class ComponentAComponent {
  constructor(private store: Store<AppState>) {}

  sendMessage() {
    this.store.dispatch(changeMessage('Hello from Component A!'));
  }
}
- Select State in Another Component:
// component-b.component.ts
import { Component, OnInit } from '@angular/core';
import { Store } from '@ngrx/store';
import { AppState } from '../store/reducers/app.reducer';

@Component({
  selector: 'app-component-b',
  template: `<p>{{ message }}</p>`,
})
export class ComponentBComponent implements OnInit {
  message: string;

  constructor(private store: Store<AppState>) {}

  ngOnInit() {
    this.store.select('app').subscribe(state => this.message = state.message);
  }
}
- Result:
When the button in Component A is clicked, the message in the global state is updated and displayed in Component B.
Advantages of Using a State Management Library
- Centralized State: An application’s state is stored centrally thanks to state management libraries like NgRx. By doing this, the difficulties of sending data via several tiers of components are avoided and it is ensured that all components may access and alter the state in a predictable manner.
- Predictable State Changes: State management libraries make sure that state changes are predictable and simpler to debug by utilizing immutable state updates and ensuring a unidirectional data flow. Over time, this aids in preserving the data integrity of the program.
- Enhanced Scalability: Managing state is harder and harder as applications get bigger and more complicated. State management libraries provide scalable solutions by giving users the means to effectively organize, update, and query application state.
- State management libraries promote the division of responsibilities and make it simpler to test application logic.
Depending on the complexity and needs of your application, there are several ways to pass data across components in Angular. Whether you go for the flexibility of a shared service, the ease of use of @Input() and @Output() decorators, or the stability of a state management library like NgRx, knowing these techniques will enable you to create Angular apps that are more dynamic and interactive.